🎧 Listen to the 60-Second Audio Recap:
This guide covers building a Proxmox backup ZFS pool with automated rsync and SMB. Google One charges roughly €10 per month for 2TB. Dropbox charges more. Over three years, that is €360 or more for storage you do not own, on servers you cannot inspect, under terms of service that can change without notice.
A used 18TB enterprise helium drive costs around €150 to €200 on the second-hand market. One purchase. No subscription. No data leaving your home.
This guide shows you how to add that drive to an existing Proxmox server and build a fully automated local backup ecosystem around it. Your Paperless-ngx documents, your media library, your personal files: all of it stays on hardware you physically control.
Where This Fits: The 3-2-1 Backup Rule
The 3-2-1 rule is the standard for data protection. Keep 3 copies of your data, on 2 different media types, with 1 copy stored offsite. This guide builds the local backup leg of that strategy. The offsite leg (encrypted sync via Borgmatic or rclone to a VPS) is covered in a future guide.
ZFS Native on Proxmox vs. TrueNAS VM: Which Approach This Guide Takes
This is an active debate on r/Proxmox. TrueNAS in a VM gives you a polished web UI and ZFS management in one place, but it adds hypervisor overhead and complicates direct disk passthrough. Running ZFS natively on the Proxmox host is leaner, faster, and integrates directly with Proxmox’s own backup scheduler. That is the approach used here. If you want a deeper comparison of native ZFS file server architecture, our guide on Ultra-Efficient DIY NAS on Proxmox: Native ZFS + Ubuntu LXC FileServer covers the design philosophy in detail.
Prerequisites and Minimal Hardware
What You Need Before Starting
- Proxmox node: Running PVE 7.x or 8.x with an existing ZFS data pool already configured for your primary storage.
- The 18TB drive: Physically installed, unformatted, and visible to the host. Confirm this with
lsblkorfdisk -lin the Proxmox shell before proceeding. - LXC container: An existing unprivileged Ubuntu or Debian LXC (CT ID 100 throughout this guide) with Samba already installed and configured for file sharing. If Samba is not installed, run
apt install sambainside the container first. - Network: The container must be reachable on your LAN. A Windows client is needed for SMB validation at the end.
Knowledge Assumptions
You should be comfortable navigating the Proxmox GUI and copying commands into a terminal. Deep Linux knowledge is not required for most steps. Understand this upfront: a single-disk ZFS pool has no redundancy. What that means and why it is still acceptable for this use case is explained in the “Honest Warnings” section below.
Choose Your Path
Newbie Nora: Proceed to Method 1. You will format the drive through the GUI and transfer files manually. It works immediately with zero configuration.
Pro Paul: Skip to Method 2. You will build a ZFS pool with logical datasets, bind it to an LXC container, configure Samba, and automate everything with rsync cronjobs.
Method 1: The Quick Start (Newbie Nora Route)
Format the Drive as an Ext4 Directory via the Proxmox GUI
- In the Proxmox web interface, click your node name in the left sidebar.
- Navigate to Disks > Directory > Create: Directory.
- Select your 18TB disk from the dropdown. Choose Ext4 as the filesystem. Give it a name such as
backup-18tb-dir. - Click Create. Proxmox will format the disk and mount it automatically.
- Go to Datacenter > Storage > Add > Directory. Set the path to the mount point Proxmox just created (typically
/mnt/pve/backup-18tb-dir) and give it a storage ID.
Transfer Files with WinSCP
SSH is active on Proxmox by default. Open WinSCP on your Windows machine, connect to your Proxmox host IP on port 22 using your root credentials, and navigate to the mount path. You can drag and drop files directly into the new directory.
Optional: One-Time Copy via Command Line
If you prefer the terminal, this command copies an entire folder to the new directory:
cp -r /source/data/ /mnt/pve/backup-18tb-dir/manual_copy/Why This Works, and Where It Breaks
It works because there is zero configuration required. The drive is usable within minutes.
It breaks because Ext4 has no checksumming. Silent data corruption — bits flipping on disk without any error being reported — goes completely undetected. More practically: manual copying gets forgotten. Within a few weeks, your “backup” is months out of date and you will not know it until you need it.
If ongoing maintenance is a concern, Method 2 automates everything after a single one-time setup. The initial configuration takes longer, but requires no further attention.
Method 2: Proxmox Backup ZFS Pool — Pro Setup
Step 1: Create the ZFS Pool via the Proxmox GUI
- In the Proxmox web interface, click your node name.
- Navigate to Disks > ZFS > Create: ZFS Pool.
- Set the pool name to
Backup_18TB. - Set RAID level to Single Disk.
- Set Compression to lz4. This is a fast, low-CPU compression algorithm that typically saves 20 to 40 percent of space on mixed data with negligible performance cost.
- Select your 18TB drive and click Create.
After creation, confirm the pool is healthy by running this in the Proxmox Shell (Node > Shell):
zpool status Backup_18TBYou should see state: ONLINE and no errors.
Step 2: Create Logical ZFS Datasets
A ZFS dataset is a logical partition within a pool. It has its own properties, quotas, and permissions, but shares the pool’s total capacity. Two datasets are created here with a deliberate purpose separation.
Open the Proxmox Shell and run:
zfs create Backup_18TB/Backups
zfs create Backup_18TB/NetwerkShare
zfs list | grep Backup_18TB
The zfs list command should show all three entries: the pool itself and both datasets.
Why two datasets? The Backups dataset is your isolated vault. It receives automated rsync jobs and Proxmox container backups. It is deliberately not exposed via SMB. The NetwerkShare dataset is your general-purpose network drive, accessible from Windows. Keeping them separate means a ransomware infection on a Windows PC can reach the share but cannot touch the backup vault.
Step 3: Bind the ZFS Dataset to the LXC Container
To make Backup_18TB/NetwerkShare accessible inside the LXC container so Samba can share it, add a mountpoint from the Proxmox host shell.
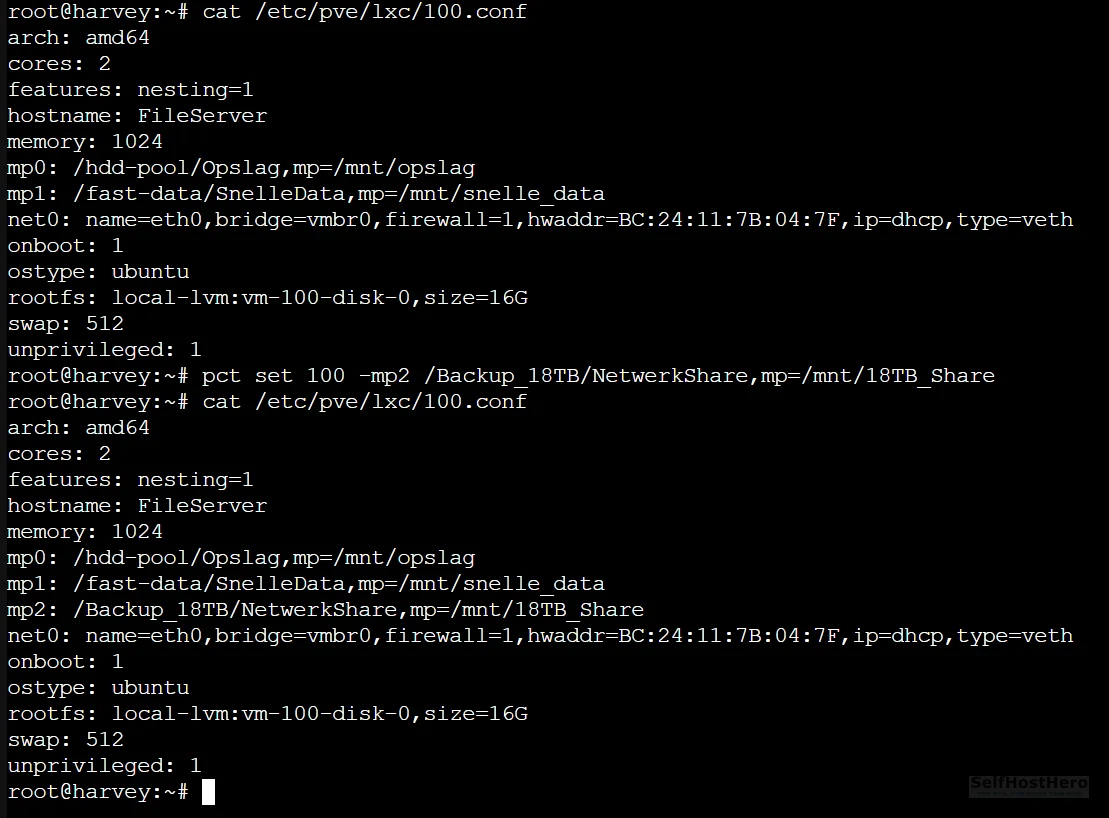
Run this on the Proxmox host (not inside the container):
pct set 100 -mp2 /Backup_18TB/NetwerkShare,mp=/mnt/18TB_ShareThis tells Proxmox to mount the host path /Backup_18TB/NetwerkShare inside CT 100 at the internal path /mnt/18TB_Share.
Now fix the directory ownership:
chown -R 100000:100000 /Backup_18TB/NetwerkShareWhy this matters: Unprivileged LXC containers use UID and GID mapping for security. The root user inside the container (UID 0) is mapped to UID 100000 on the host. If the host directory is owned by root (UID 0), every file write from inside the container fails with Permission denied. The chown command above transfers ownership to the mapped UID, which resolves this entirely.
Step 4: Configure Samba Inside the LXC Container
Enter the container:
pct enter 100Open the Samba configuration file:
nano /etc/samba/smb.confScroll to the bottom of the file and append the following block exactly as shown:
[Opslag_18TB]
path = /mnt/18TB_Share
writeable = yes
browseable = yes
valid users = nasuser
Save and exit (Ctrl+X, then Y, then Enter in nano).
Create the Samba user. Note that smbpasswd only manages passwords for users that already exist on the system, so first create a dedicated account for it (no login shell and no home directory are needed), then set its Samba password:
useradd -M -s /usr/sbin/nologin nasuser
smbpasswd -a nasuser
You will be prompted to set a password.
Validate the configuration and restart the service:
testparm
systemctl restart smbd
testparm parses your entire smb.conf and reports any syntax errors with exact line numbers. If it outputs Loaded services file OK, proceed.
Step 5: Register the Backup Storage in Proxmox Datacenter
Register the Backups dataset as a storage target in Proxmox so the built-in backup scheduler can write to it.
- Navigate to Datacenter > Storage > Add > Directory.
- Set ID to
Local_Backups. - Set Path to
/Backup_18TB/Backups. - Under Content, select VZDump backup file.
- Click Add.
Step 6: Schedule Automated Container Backups via the GUI
- Navigate to Datacenter > Backup > Add.
- Select your node.
- Set Storage to
Local_Backups. - Set the schedule to 03:00 daily.
- Set Retention: Keep Last = 7. This keeps one week of rolling backups and automatically deletes older ones.
- Select which containers and VMs to include, then click Create.
Step 7: Automate Data Sync with Rsync Cronjobs
This step is not optional. Proxmox’s VZDump backup system intentionally skips LXC mountpoints (mp0, mp1, mp2). This is by design. The container’s root filesystem is backed up, but any data living on a bind-mounted path — such as a 5TB media library — is excluded. Rsync cronjobs are the only mechanism that protects that data.
On the Proxmox host, open the root crontab:
crontab -eAdd these two lines at the bottom:
# Sync media library — runs at 04:00 daily
0 4 * * * rsync -a --delete /hdd-pool/Opslag/ /Backup_18TB/Backups/Opslag_Kopie/

# Sync fast-tier app data — runs at 05:00 daily
0 5 * * * rsync -a --delete /fast-data/SnelleData/ /Backup_18TB/Backups/SnelleData_Kopie/
Adjust the source paths to match your actual data locations.
Flag breakdown:
-a(archive mode): Recursively copies directories and preserves file permissions, ownership, and timestamps.--delete: Removes files from the destination that no longer exist at the source. This keeps the backup a clean mirror rather than an accumulation of deleted files.
Configuration and Validation: Prove It Actually Works
Validate the LXC Mountpoint Is Registered
Run this on the Proxmox host:
cat /etc/pve/lxc/100.conf | grep mpYou should see a line containing mp2 with the correct host path and internal mount path. If the line is missing, the pct set command from Step 3 did not apply correctly. Re-run it and check again.
Validate the Samba Configuration Syntax
Inside the container (pct enter 100), run:
testparmExpected output ends with Loaded services file OK. Any errors will show the exact line number in smb.conf that caused the problem.
Run a Manual Rsync Test in Verbose Mode
Before trusting the cronjob, run the sync manually to watch it in real time and catch errors immediately:
rsync -avh --delete /fast-data/SnelleData/ /Backup_18TB/Backups/SnelleData_Kopie/The additional flags: -v (verbose: prints each file as it is transferred) and -h (human-readable: shows file sizes in MB/GB instead of raw bytes).
Important: If this is the first sync of a large dataset, such as 5TB of media files, it will run for several hours. That is normal. Every subsequent nightly run will take only minutes because rsync only transfers files that have changed.
Test the SMB Share from a Windows Client
- Open File Explorer on your Windows machine.
- In the address bar, type
\\[YOUR-LXC-CONTAINER-IP]\Opslag_18TBand press Enter. - Authenticate with the
nasusercredentials you set in Step 4. - Create a test file inside the share.
- Back on the Proxmox host, verify the file exists at
/Backup_18TB/NetwerkShare/.
If the file appears on both sides, the mountpoint, ownership fix, and Samba configuration are all working correctly.
The Honest Warnings: Quirks, Limits, and Things That Will Surprise You
Single-Disk ZFS Has No Redundancy. That Is Acceptable Here.
If the 18TB drive physically fails, you lose the backup copy. You do not lose your original data, which lives on your primary pool. This is the correct mental model for a backup tier: the backup drive failing is an inconvenience, not a catastrophe. Your originals survive.
This setup is not acceptable as a primary storage pool. Never store data exclusively on a single-disk ZFS pool.
If you want redundancy later, you can add a second drive and convert the pool to a mirror without data loss using zpool attach Backup_18TB [existing-disk] [new-disk]. That conversion is covered in a future guide.
The Initial Rsync of 5TB Will Take Hours
Schedule it during off-hours. Expect high I/O and a CPU spike during the first run. Once the initial sync completes, every subsequent nightly run takes only minutes because rsync compares file modification times and only transfers what has changed. The --delete flag handles removals cleanly.
The Backups Dataset Is Deliberately Not Shared via SMB
This is an intentional security decision. A ransomware infection on a Windows PC can encrypt everything it can reach over the network. By keeping the Backups dataset off the SMB share entirely, a compromised Windows machine has no network path to your backup vault. The NetwerkShare dataset can be encrypted by ransomware, but your actual backups remain untouched.
This directly addresses the concern raised repeatedly on r/Proxmox about combining Samba and ZFS on the same host without isolation.
VZDump Does Not Back Up Mountpoints. This Is by Design.
Proxmox explicitly excludes mp0, mp1, mp2, and all other mountpoints from container backups. This is documented behavior, not a bug. The rsync cronjobs in Step 7 are not a workaround. They are the correct and only mechanism for protecting data stored on bind-mounted paths.
Troubleshooting Common Errors
Error: “Permission denied” When Writing Files Inside the LXC Container
Cause: The host directory is owned by UID 0 (root). The unprivileged container maps its internal root to UID 100000 on the host. These do not match, so writes fail.
Fix: Run this on the Proxmox host, not inside the container:
chown -R 100000:100000 /Backup_18TB/NetwerkShareRestart the container after applying this fix: pct reboot 100.
Error: smbd Fails to Start After Editing smb.conf
Cause: A syntax error in the configuration file. A common mistake is writing guest ok = nasuser instead of valid users = nasuser.
Fix: Run testparm inside the container. It will output the exact line number of the error. Correct the line, then restart:
systemctl restart smbdError: Proxmox Backup Jobs Complete But Media Files Are Missing
Cause: This is expected behavior. VZDump skips all LXC mountpoints by design.
Fix: Confirm your rsync cronjobs are active by running crontab -l on the Proxmox host. If the jobs are listed, run a manual verbose sync to verify they work correctly:
rsync -avh --delete /hdd-pool/Opslag/ /Backup_18TB/Backups/Opslag_Kopie/Error: ZFS Pool Not Visible After a Reboot
Cause: The pool was not imported on boot, usually because it was created outside of Proxmox’s storage management or the import cache is stale.
Fix: Import the pool manually:
zpool import Backup_18TBThen confirm that zfs-import-cache.service is enabled so this happens automatically on future reboots:
systemctl enable zfs-import-cache.serviceConclusion: What You Have Built
The Completion Checklist
- 18TB drive formatted as a ZFS Single Disk pool named
Backup_18TB - Two datasets created and logically separated:
/Backupsvault and/NetwerkSharegeneral share - SMB share mounted into an unprivileged LXC with correct UID 100000 ownership
- Proxmox GUI configured for automated 7-day rolling container backups to the isolated vault
- Two rsync cronjobs running nightly for media and app-data replication
- Backup dataset intentionally isolated from SMB as a ransomware air gap
Where This Fits in the 3-2-1 Strategy
- 3 copies: Original data on your primary pool + ZFS backup pool + (future) offsite copy
- 2 media types: Primary SSD or HDD pool + the 18TB backup drive
- 1 offsite copy: The next guide in this series covers encrypted offsite sync using Borgmatic or rclone to a VPS. That completes the strategy.
What to Build Next
With your storage foundation in place and protected, you can build on top of it without risk. The logical next step is deploying the media automation stack, starting with Prowlarr for centralized indexer management. Your media library now has a backup, so you can build confidently.
Further ahead: converting this single-disk ZFS pool to a mirrored pair for redundancy, without any data loss, using zpool attach.