🎧 Listen to the 60-Second Audio Recap:
What Is Homepage Dashboard and Why Does It Belong on Your Homelab?
This guide covers the complete Homepage dashboard Proxmox LXC setup. Homepage is a self-hosted, YAML-configured start page that pulls live data directly from your infrastructure through API widget integrations. You define everything in plain text files, commit them to Git, and your entire dashboard is reproducible from scratch in minutes. That is the Infrastructure as Code promise, and Homepage delivers it.
Compare that to cloud-synced alternatives like Notion, browser bookmarks, or Netvibes. Those services log your URL access patterns. Every time you click a bookmark, a request leaves your network. You are handing a map of your digital life to a third party in exchange for convenience.
Homepage speaks exclusively to local APIs — the Docker socket, the Proxmox API, your local service endpoints. Zero status bytes leave your home network. No telemetry. No cloud dependency. No account required.
One honest note on the competition: Homarr is visually easier to configure and has a drag-and-drop UI that beginners will appreciate. But if you want live Proxmox CPU and RAM stats, Docker container status, and deep service integrations, this guide is for you. Homarr is a valid starting point. Homepage is where you end up when you want the real thing.
What You Will Have When This Guide Is Done
- A Homepage Docker stack running inside a Proxmox LXC container
- The Next.js host validation bypass confirmed and working
- SMB-editable YAML config files — the unprivileged LXC permission problem permanently solved
- A live Proxmox CPU and RAM widget powered by a dedicated API Token
- The foundation for Docker socket integration with services like Jellyfin and Immich (covered in the next article)
Prerequisites and Minimal Hardware
Required Infrastructure
- Proxmox VE 8+ (this guide is tested on PVE 8.x)
- An existing LXC container with Docker and Portainer installed. If you have not done this yet, our guide on building a Docker and Portainer environment on Proxmox LXC covers the full setup.
- An SMB share mapped to your config directory (strongly recommended for editing YAML files from Windows)
- Network access to the Proxmox web UI at
https://PROXMOX_IP:8006
Required Knowledge Level
| Beginner Needs | Experienced User Needs |
|---|---|
| Know how to open Portainer and deploy a stack by pasting a Compose file | Comfortable with SSH into the Proxmox host shell |
| Know your LXC container’s IP address | Understand YAML indentation rules (2 spaces, no tabs) |
| Know how to map a network drive in Windows Explorer | Familiar with API token creation and UID namespace concepts |
A Note on YAML Before You Begin
services.yaml silently crashes an entire widget category. You will not get a helpful error message. The widget simply disappears. Before saving any YAML file, validate it with yamllint on the command line or paste it into yamllint.com for a quick browser-based check.Method 1 — Homepage Dashboard Proxmox LXC: Quick Start
Deploy Homepage via Portainer UI (No Terminal Required)
This method gets you a running Homepage instance in under five minutes. No SSH. No terminal. Just Portainer.
- Open Portainer in your browser and navigate to Stacks in the left sidebar.
- Click Add Stack. Give it a name like
homepage. - Paste the following minimal Docker Compose into the web editor:
version: '3'
services:
  homepage:
    image: ghcr.io/gethomepage/homepage:latest
    container_name: homepage
    restart: unless-stopped
    ports:
      - 3000:3000
    volumes:
      - homepage_config:/app/config

volumes:
  homepage_config:
- Click Deploy the stack.
- Wait about 30 seconds for the image to pull, then open your browser and navigate to
http://10.10.10.7:3000(replace with your LXC’s actual IP).
Expected result: You will see the default “My First Group” demo layout. Homepage is running.
What You Will Hit Next (An Honest Warning)
Here is what happens next for most people. You open Windows Explorer, navigate to your SMB share, find the services.yaml file, try to save a change, and Windows throws a Permission denied error. The file is locked. You cannot edit it.
This is not a Windows problem. It is not an SMB problem. It is a fundamental behavior of unprivileged LXC containers in Proxmox. When the Docker container creates files inside the container, those files are owned by UID 100000 on the Proxmox host filesystem. Your Windows SMB session has no permission to write to files owned by that UID. The full fix requires two commands run from the Proxmox host shell — which is covered in Method 2.
Method 2 — The Production Setup (Infrastructure as Code)
Step 1 — The Production Docker Compose with Host Validation Fix
Homepage is built on Next.js. By default, Next.js blocks direct IP address access and throws a Host validation failed error. You will see a red banner in your browser and errors in the Portainer container logs. This is not a bug in Homepage — it is a security feature of the underlying framework. The fix is a single environment variable.
The variable is HOMEPAGE_ALLOWED_HOSTS. You pass it your LXC’s IP address, both with and without the port number. That tells Next.js to accept requests from that host.
In Portainer, navigate to Stacks, click Add Stack, and paste this production-ready Compose file:
version: '3'
services:
  homepage:
    image: ghcr.io/gethomepage/homepage:latest
    container_name: homepage
    restart: unless-stopped
    environment:
      - HOMEPAGE_ALLOWED_HOSTS=10.10.10.7,10.10.10.7:3000
    ports:
      - 3000:3000
    volumes:
      - /mnt/snelle_data/App_Data/docker_configs/homepage:/app/config
      - /var/run/docker.sock:/var/run/docker.sock:ro
Two things to note about this Compose file:
- Replace
10.10.10.7with your actual LXC IP address in theHOMEPAGE_ALLOWED_HOSTSline. - Replace the volume path
/mnt/snelle_data/App_Data/docker_configs/homepagewith the actual path on your LXC container where you want to store the config files. - The
:roflag on the Docker socket mount means read-only. Homepage can read container data but cannot control the Docker daemon. Never mount the Docker socket read-write unless a service explicitly requires it.
Click Deploy the stack. The container will start, but do not try to edit the YAML files yet. Do Step 2 first.
Step 2 — Fixing LXC Permissions (The Core of Permission Hell)
Here is the technical root cause. Proxmox runs LXC containers in unprivileged mode by default. The container’s internal UID 0 (root) is mapped to UID 100000 on the Proxmox host. When the Homepage container creates its default config files inside /app/config, those files appear on the Proxmox host filesystem owned by 100000:100000. Your SMB session, running as a normal user, cannot write to them.
The fix is to explicitly set the ownership and permissions on the config directory from the Proxmox host. Not from inside the LXC. Not from inside the Docker container. From the Proxmox host shell directly.
chown from inside the LXC container or from inside the Docker container, it will appear to succeed but will have no effect on the actual host filesystem ownership. This is the single most common mistake people make.SSH into your Proxmox host, then run the following commands in order. (Note: /fast-data/SnelleData is the ZFS path on the Proxmox host; it is the same data your container sees at /mnt/snelle_data via the bind mount from the storage guide. That is why the chown runs on the host while the Compose volume uses the container path.)
1. Navigate to the config directory:
cd /fast-data/SnelleData/App_Data/docker_configs/homepage/
2. Remove the default stub files that Homepage created on first boot:
rm -f docker.yaml kubernetes.yaml custom.css custom.js bookmarks.yaml
These files were created by the container and are owned by 100000:100000. Removing them now prevents ownership conflicts when you create your own versions.
3. Fix the ownership of the entire config directory:
chown -R 100000:100000 /fast-data/SnelleData/App_Data/docker_configs/homepage
4. Set permissions so your SMB session can write to the files:
chmod -R 777 /fast-data/SnelleData/App_Data/docker_configs/homepage
After these four commands, open Windows Explorer, navigate to your SMB share, and try editing services.yaml. The Permission denied error is gone.
chmod 777 grants read, write, and execute to all users. This is acceptable for a config folder on a home network that is not exposed to the internet. In a production or multi-user environment, scope this down to 775 and add your SMB user to the 100000 group instead.Step 3 — Creating the Proxmox API Token (No 2FA Workarounds Needed)
You might be tempted to use your Proxmox root password directly in the widget configuration. Do not. There are two reasons this fails:
- If your root password contains special characters (like
!,@, or#), YAML will misparse the value and the API call will return a malformed JSON error. - If you have 2FA enabled on your root account (and you should), the Proxmox API will reject the call entirely. API calls cannot complete a TOTP challenge.
The correct solution is a dedicated API Token. Here is how to create one:
- Open the Proxmox web UI at
https://10.10.10.2:8006. - Navigate to Datacenter in the left tree, then click Permissions, then API Tokens.
- Click Add.
- Set User to
root@pam. - Set Token ID to
homepage. - Uncheck “Privilege Separation.” This is the critical step. With Privilege Separation enabled, the token has reduced permissions and the Proxmox widget will return empty data. Unchecking it gives the token the same permissions as the root user.
- Click Add. A dialog will appear showing the Token Secret. Copy it immediately. Proxmox will never show this value again.
Your resulting Token ID will be in the format root@pam!homepage. The exclamation mark is part of the syntax — it separates the user from the token name.
Step 4 — Configuring the Proxmox Widget in services.yaml
Open your SMB share from Windows Explorer (it is writable now after Step 2) and open services.yaml in any text editor. VS Code is recommended because it highlights YAML indentation errors inline.
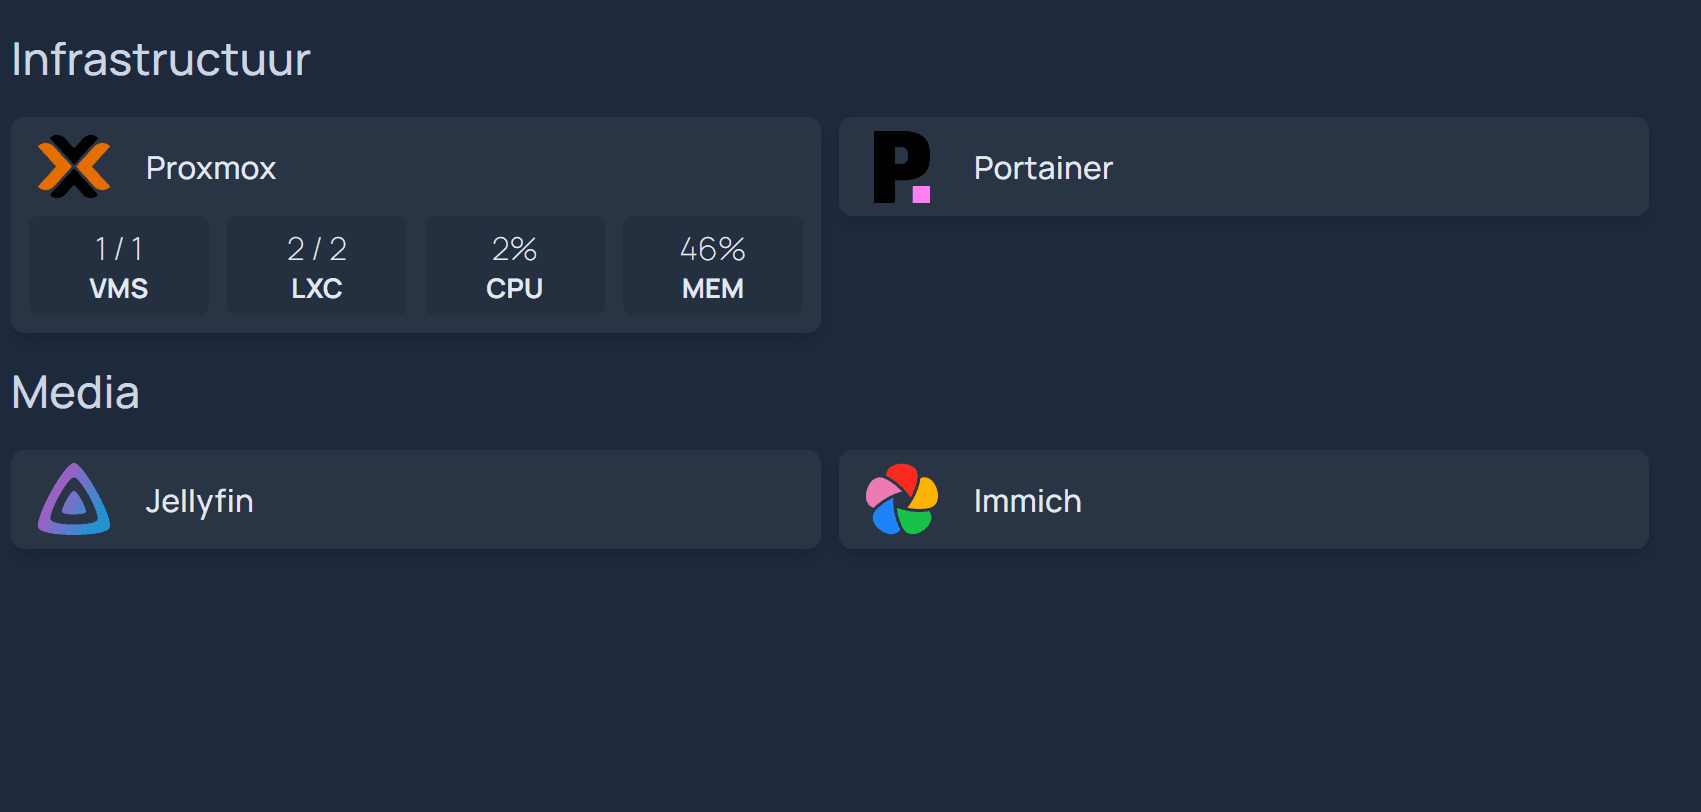
The structure of services.yaml is: top-level keys are group names, and each group contains a list of service entries. Add the following block:
- Infrastructuur:
    - Proxmox:
        icon: proxmox
        href: https://10.10.10.2:8006
        widget:
          type: proxmox
          url: https://10.10.10.2:8006
          username: root@pam!homepage
          password: 'YOUR_API_TOKEN_SECRET'
          node: harvey
Replace YOUR_API_TOKEN_SECRET with the secret you copied in Step 3. Replace harvey with your actual Proxmox node name (visible in the left tree of the Proxmox UI). Replace 10.10.10.2 with your Proxmox host’s IP address.
Indentation rules for this block:
- Use exactly 2 spaces per indent level. No tabs.
widget:must be at the same indentation level asicon:andhref:.- The fields under
widget:(type,url,username,password,node) are indented 2 more spaces underwidget:. - Wrap the token secret in single quotes if it contains any special characters.
services.yaml. If you place it in widgets.yaml, you will get a “Missing proxmox” error banner at the top of your dashboard. These two files serve different purposes. widgets.yaml is for top-of-page information widgets (like a clock or a search bar). services.yaml is for your service cards with live data.Save the file. Homepage will detect the change and hot-reload automatically.
Configuration and Validation
How Homepage Handles Config Reloads (No Restart Needed)
Homepage watches its YAML files for changes and hot-reloads on every save. You do not need to run docker restart homepage after editing a config file. Save the file, switch to your browser, and the change appears within a few seconds.
Validation Checklist — Three Things to Confirm
Work through these three checks in order after completing the setup:
Check 1 — Host Validation: Open your browser and navigate to http://10.10.10.7:3000. There should be no red “Host validation failed” banner. If you see one, verify that the HOMEPAGE_ALLOWED_HOSTS environment variable in your Portainer stack matches your LXC’s actual IP address exactly.
Check 2 — SMB Write Access: Open your SMB share from Windows Explorer, open services.yaml, make a trivial change (like adding a comment), and save. If the save succeeds without a Permission denied error, the LXC permission fix worked correctly.
Check 3 — Proxmox Widget Live Data: The Proxmox entry in your dashboard should render as a wide card with CPU and RAM progress bars. If it shows as a plain link button with no bars, the widget block is either missing, malformed, or the API token is incorrect. Re-read Step 4 and verify indentation.
To watch for API errors in real time, tail the container logs from your LXC shell:
docker logs -f homepage
A healthy log will show lines like GET /api/widgets/proxmox 200. An API error will show Unexpected end of JSON input or 401 Unauthorized. The 401 almost always means Privilege Separation is still enabled on your API token — go back to Step 3 and recreate the token with it unchecked.
The Ugly Truth — Quirks and Honest Limitations
The Learning Curve Is Real
Homepage is not a beginner tool. Here is what will frustrate you before it rewards you:
- YAML errors fail silently per category. If you have a malformed block in your Infrastructure group, that entire group disappears from the dashboard. No global error. No log entry pointing to the line number. You debug by process of elimination.
- There is no built-in GUI editor. Everything is YAML files. For some people this is a feature — your config is version-controllable and portable. For others it is a dealbreaker. Know which camp you are in before investing time here.
- API token setup adds upfront friction. Every service behind 2FA (Proxmox, and potentially others) requires a dedicated API token. This is the right security posture, but it takes time to set up correctly the first time.
Homepage vs. The Alternatives (Honest Comparison)
- Homarr: Easier to start, drag-and-drop interface. Fewer deep integrations. Valid choice if you do not need live infrastructure stats.
- Dashy: More visual customization options, also YAML-based like Homepage. Slightly more complex initial configuration.
- What’s Up Docker (WUD): Frequently recommended alongside Homepage on Reddit, but it solves a completely different problem. WUD handles container update detection and notifications. It is a complement to Homepage, not a replacement for it.
- Homepage wins when: You want live infrastructure data — CPU, RAM, container status, service health — from a single pane of glass, with zero cloud dependency and full version control of your configuration.
What Reddit Gets Wrong (And This Guide Gets Right)
Three recurring Reddit threads are worth addressing directly:
“Proxmox and Portainer show nothing on my Homepage widget.” This is almost always the Privilege Separation issue. The token was created with Privilege Separation enabled, which restricts its permissions below what the Proxmox widget needs. Go to Datacenter, delete the token, and recreate it with Privilege Separation unchecked. This resolves the issue in nearly every case.
“Homepage doesn’t work over Tailscale.” The HOMEPAGE_ALLOWED_HOSTS environment variable must include your Tailscale IP address if you are accessing Homepage via your Tailnet. Add it as a third comma-separated value: HOMEPAGE_ALLOWED_HOSTS=10.10.10.7,10.10.10.7:3000,100.x.x.x.
“Just use WUD instead.” WUD is excellent at what it does — notifying you when a newer Docker image is available. It does not display service status, infrastructure stats, or act as a dashboard in any meaningful sense. Use both tools together.
Troubleshooting Common Errors
Error: “Host validation failed” Red Banner
Cause: Next.js (the framework powering Homepage) rejects direct IP address access by default as a security measure.
Fix: Add the HOMEPAGE_ALLOWED_HOSTS environment variable to your Docker Compose stack in Portainer. Redeploy the stack after adding it.
environment:
  - HOMEPAGE_ALLOWED_HOSTS=10.10.10.7,10.10.10.7:3000
Error: “Permission denied” When Editing YAML via SMB on Windows
Cause: Unprivileged LXC UID namespace mapping. Files created inside the container are owned by UID 100000 on the host filesystem. Your SMB session cannot write to them.
Fix: Run these two commands from the Proxmox host shell — not from inside the LXC, not from inside the Docker container:
chown -R 100000:100000 /fast-data/SnelleData/App_Data/docker_configs/homepage
chmod -R 777 /fast-data/SnelleData/App_Data/docker_configs/homepage
Error: “API Error: Unexpected end of JSON input” on Proxmox Widget
Cause A: Your root password contains special characters that break YAML parsing when used directly as the password value.
Cause B: Your root account has 2FA enabled. The Proxmox API cannot complete a TOTP challenge, so the call is rejected before any data is returned.
Fix: Create a dedicated API Token in the Proxmox UI under Datacenter > Permissions > API Tokens. Set the user to root@pam, set a Token ID of homepage, and uncheck Privilege Separation. Use the resulting Token ID (root@pam!homepage) as the username and the copied secret as the password in services.yaml.
Error: “Missing proxmox” Banner at the Top of the Screen
Cause: The Proxmox widget block was placed in widgets.yaml instead of services.yaml.
Fix: Move the entire widget block — from the group name down through the node: line — into services.yaml. The widgets.yaml file is for top-of-page informational widgets only.
Error: Proxmox Widget Shows a Plain Link Button Instead of CPU/RAM Bars
Cause: The widget: block is either missing from the service entry or has incorrect indentation. If widget: is not at the same indent level as icon: and href:, Homepage will render the entry as a plain bookmark link.
Fix: Open services.yaml and verify the indentation carefully. The structure should look exactly like this:
- Infrastructuur:
    - Proxmox:
        icon: proxmox
        href: https://10.10.10.2:8006
        widget:
          type: proxmox
          url: https://10.10.10.2:8006
          username: root@pam!homepage
          password: 'YOUR_API_TOKEN_SECRET'
          node: harvey
Run the file through a YAML linter before saving if you are unsure about the indentation.
Conclusion and Next Steps
What You Have Built
Here is what is now running in your homelab:
- Homepage Docker stack is running and accessible at
http://10.10.10.7:3000 - The
HOMEPAGE_ALLOWED_HOSTSenvironment variable is configured — no host validation errors - LXC permissions are fixed — YAML files are editable from Windows via SMB without errors
- A dedicated Proxmox API Token is active and the widget is displaying live CPU and RAM data
- Zero data is leaving your home network — no telemetry, no cloud dependency, no accounts
The Infrastructure as Code Payoff
Your entire dashboard now lives in a handful of YAML files inside your /config directory. Back that folder up to a Git repository — even a private one on your local Gitea instance — and you can rebuild your complete dashboard from scratch in under five minutes on any new machine. Your dashboard is not a collection of browser bookmarks. It is a versioned, portable, reproducible piece of infrastructure. This same principle applies to every other service you are running, from Paperless-ngx to Nextcloud — when your config is code, recovery is fast.