🎧 Listen to the 60-Second Audio Recap:
What’s Actually Happening With Your Sensor Data Right Now
This guide covers how to pair Zigbee sensor Home Assistant ZHA without a vendor hub. A Zigbee humidity sensor costs about $8. The hub the manufacturer tells you to buy costs another $30 to $50. That hub is not a convenience device. It is a data pipeline that routes every reading your sensor takes directly to a vendor cloud server. The sensor is cheap. The data you hand over is not.
Standard vendor gateways like the Xiaomi Aqara Hub and the Tuya Gateway are configured out of the box to transmit your sensor data to remote servers. This is not a bug. It is the business model. Here is what that data includes:
- Motion timestamps that reveal when you enter and exit rooms
- Temperature and humidity readings that expose your shower schedule and home occupancy patterns
- Device state changes that map when you wake up, when you go to bed, and when the house is empty
The ZHA case is straightforward. Your Zigbee USB antenna speaks the Zigbee protocol directly. It talks to the sensor. The data goes into Home Assistant. It never leaves your local network.
One point worth addressing directly: many users are surprised to learn that the vendor hub is optional, not mandatory. The box says “requires Aqara Hub.” That is a commercial requirement, not a technical one. If you have a Zigbee coordinator and ZHA running, you already have everything you need.
Privacy comparison: With ZHA: Sensor → Zigbee Antenna → Home Assistant (local). With a vendor hub: Sensor → Hub → Cloud Server → Home Assistant. One of these paths leaves your house. Only one is acceptable for a self-hosted setup.
Prerequisites and Minimal Hardware
What You Need Before You Start
Before you touch the sensor, confirm you have the following in place:
- A running Home Assistant instance with the ZHA integration already configured and an active Zigbee antenna
- ZHA integration configured with a recognized Zigbee coordinator (your USB antenna or built-in radio)
- A battery-powered Zigbee sensor — this guide uses the HOBEIAN ZG-227Z as the reference device
- A paperclip to trigger pairing mode on the sensor
- Physical proximity to your Home Assistant server or a powered Zigbee router node during pairing
That last point matters more than most guides admit. During pairing, your sensor communicates directly with the coordinator only. It cannot yet use the mesh. If you are three rooms away, the signal may be too weak to complete the interview. Get close first. Move the sensor to its final location after pairing is confirmed.
A Note on Zigbee Coordinators vs. Routers
Your Zigbee network has three types of devices. Understanding them will save you hours of troubleshooting.
Coordinator (your USB stick or built-in radio)
    └── Router nodes (powered smart plugs, powered bulbs)
            └── End devices (battery-powered sensors)
Battery-powered sensors are end devices. They sleep aggressively to preserve battery life. They do not route traffic for other devices. A sensor that works perfectly at 1 meter may appear dead at 8 meters if there is no router node in between. Pair your sensors close to a router node that is physically near the sensor’s intended final location, not necessarily close to the coordinator itself.
Method 1 — The Vendor Hub Path (What Not to Do and Why)
Fast, Convenient, and a Privacy Problem
This is the path the box tells you to take. It is designed to be frictionless, and it succeeds at that. Here is what that path looks like:
- Buy a sensor at a hardware store
- Purchase the hub separately for $30 to $50
- Download the vendor app and create an account with your email address
- Follow the in-app pairing wizard
- Add the cloud integration in Home Assistant
Trade-offs:
- ❌ All sensor data transits vendor cloud infrastructure
- ❌ Stops working if your internet connection goes down
- ❌ Stops working if the vendor discontinues the service or changes their API
- ❌ Additional hardware cost of $30 to $50 for the hub
- ✅ Setup time is roughly 15 minutes with no technical knowledge required
If you already have a Zigbee antenna configured in ZHA, you have everything you need. The hub is redundant. Here is the better path.
If you are still building out your self-hosted infrastructure and want a low-cost entry point, our AVATTO HA 70 review covers a $37 device that ships with Home Assistant pre-installed and a Zigbee radio built in. It eliminates the vendor hub question entirely.
Method 2 — Pair Zigbee Sensor Home Assistant ZHA: Native Pairing
Step 1 — Open the ZHA Pairing Interface in Home Assistant
ZHA’s pairing mode is time-limited, typically 60 to 120 seconds depending on your coordinator firmware. Read through all steps before you start the timer.
Navigate to the pairing interface using this path:
Settings → Devices & Services → Zigbee Home Automation (ZHA) → Configure → Add DeviceHome Assistant will display a spinner indicating it is searching for Zigbee devices. Leave this screen open and move immediately to Step 2.
Step 2 — Put Your Sensor Into Pairing Mode
Every manufacturer implements pairing mode differently. Always check your specific manual first. The paperclip-reset method covers roughly 80% of battery-powered Zigbee sensors on the market. For the HOBEIAN ZG-227Z specifically:
1. Locate the small reset pinhole on the sensor body
2. Insert a paperclip into the pinhole
3. Hold for 5 to 10 seconds
4. Release when the LED begins rapid blinking
5. The sensor is now in pairing mode
Warning: Do not walk away. Battery sensors are designed to sleep the moment they detect no activity. If the sensor falls asleep mid-interview, the pairing will fail. Stay close. If the LED stops blinking before the interview completes, press the pairing button briefly every 20 to 30 seconds to keep the sensor awake.
This is the single most common failure mode for first-time ZHA pairings. The sensor is not broken. It went to sleep. Keep it awake.
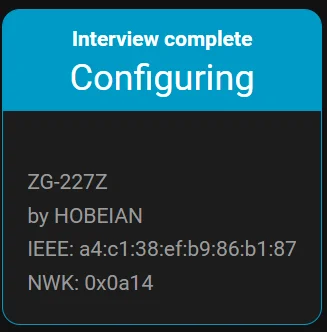
Step 3 — Monitor the ZHA Interview Process
When ZHA detects your sensor, it begins an “Interview.” This is Home Assistant querying the device for its cluster capabilities: what data it can report, at what intervals, and with what precision. You will see this reflected in the UI as a progress bar or status text.
In your Home Assistant logs, the interview looks like this:
[ZHA] Device joined: HOBEIAN ZG-227Z (IEEE: xx:xx:xx:xx:xx:xx:xx:xx)
[ZHA] Interviewing device...
[ZHA] Interview complete. Discovered clusters: temperature, humidity, power_configuration
The key line is “Interview complete.” Until you see that, the device is not fully configured. If the interview stalls, the most likely cause is the sensor falling asleep. Press the pairing button briefly to wake it and allow the interview to resume.
Once the interview completes, Home Assistant will prompt you to name the device and assign it to an Area.
Step 4 — Assign an Area and Customize Entity Names
1. In the "Device Added" dialog, enter a device name: e.g., "Bathroom Humidity Sensor"
2. Select Area: Bathroom (create a new area if it does not exist yet)
3. Optionally set a custom icon — use mdi:water-percent for a humidity sensor
4. Click Finish
Assigning an Area is not cosmetic. Home Assistant uses Area assignments to power dashboard auto-generation, voice assistant context, and automation suggestions. Do it now and save yourself reorganization work later.
Configuration and Validation — Confirming Your Sensor Is Actually Working
Verify Entities Are Populated on the Device Dashboard
Navigate to your new device’s dashboard:
Settings → Devices & Services → ZHA → [Your Device Name] → Device DashboardYou should see the following entities populated:
Entities visible:
├── temperature        → 21.8 °C
├── humidity           → 61.7 %
└── battery            → 87 %
If any of these show “Unknown,” do not panic yet. Battery sensors report on a schedule or on change, not continuously. Give it time. We will force a reading in the next step.
The Breath Test — Force a Live Reading
Exhaled human breath is approximately 37°C and close to 100% relative humidity. It creates an immediate, measurable delta that your sensor will detect and report. This is the fastest way to confirm your local Zigbee pipeline is fully operational.
1. Open the device dashboard on your phone or browser
2. Exhale slowly and directly into the sensor opening for 3 to 5 seconds
3. Watch the humidity entity — expect a rise from baseline (e.g., 61.7% → 78–85%)
4. Temperature should also tick upward by 0.5 to 2°C within 10 to 30 seconds
Success: If you see those numbers move, your local Zigbee pipeline is fully operational. No cloud involved. No vendor account. No data leaving your network.
The Honest Truth — Quirks, Limitations, and What Gets Left Out
Battery Sensors Sleep. A Lot. This Will Frustrate You.
This is not a ZHA problem. It is a Zigbee specification behavior. Battery-powered end devices are engineered to minimize radio-on time. Here is what that means in practice:
- Default reporting intervals range from 5 to 60 minutes depending on the device firmware
- An “Unknown” entity state immediately after pairing is normal, not a failure
- Your first real reading under normal conditions may not appear for 30 to 60 minutes
- The breath test or refrigerator trick (described in troubleshooting below) forces an immediate report by creating a measurable change
ZHA vs. Zigbee2MQTT — The Honest Comparison
ZHA is not the only way to run Zigbee in Home Assistant. Zigbee2MQTT (Z2M) is a legitimate alternative with a larger device compatibility database. Here is a direct side-by-side:
| Factor | ZHA | Zigbee2MQTT |
|---|---|---|
| Setup complexity | Lower | Higher |
| Device support breadth | Good | Broader |
| UI integration | Native HA | Requires add-on or container |
| Quirks and edge case handling | Improving | More mature |
For mainstream sensors like the ZG-227Z, ZHA is fully sufficient. If you expand to 20 or 30 devices and encounter a device with poor ZHA quirks support, Z2M is worth evaluating at that point. It adds operational complexity, but it earns that complexity with broader compatibility. ZHA is the right starting point for most users.
Pairing Range Is Not the Same as Operating Range
During pairing, your sensor can only communicate directly with the coordinator. It has not yet joined the mesh. A sensor that will eventually operate perfectly at 10 meters through two router nodes must be paired within close range of the coordinator or a nearby router. Pair it close. Move it after. This single habit eliminates the majority of “sensor not found” complaints.
Troubleshooting Common Errors
Problem — Sensor Is Not Discovered at All
Symptom: ZHA search times out and no device appears in the interface.
1. Move the sensor within 1 to 2 meters of your HA server or a powered Zigbee router node
2. Re-enter pairing mode using the paperclip reset
3. While HA is searching, press the pairing button briefly every 20 seconds to prevent sleep
4. Check ZHA logs for any IEEE address appearing:
   Settings → System → Logs → filter by "ZHA"
If an IEEE address appears in the logs but the device never shows in the UI, the interview likely failed due to the sensor sleeping. Delete any partial device entry and re-pair from scratch with the sensor held close.
Problem — Device Paired But All Entities Show “Unknown”
Symptom: The device dashboard shows entities but all values are blank or “Unknown.”
1. Wait 30 to 60 minutes — battery sensors report on change or on schedule
2. Force a change: place the sensor in a refrigerator for 2 minutes
   (the temperature drop triggers an immediate report)
3. Alternatively: use the breath test described in the Validation section
4. If still Unknown after 2 hours: delete the device, re-pair,
   and ensure the Interview completes fully before finishing
Problem — Interview Fails Midway or Device Shows as Partially Configured
Symptom: ZHA shows the device but with missing clusters or a warning about quirks not being loaded.
1. Delete the device from ZHA completely
2. Re-pair with the sensor held within 50cm of the coordinator
3. Keep the sensor awake by pressing the pairing button every 15 seconds during the interview
4. Check the ZHA quirks library at github.com/zigpy/zha-device-handlers
   (or the device database at zigbee.blakadder.com) for your specific device model
Partially configured devices are almost always caused by the sensor sleeping during the interview. The solution is always the same: closer proximity, active keep-alive button presses, and patience.
Completion Checklist and Next Steps
Completion Checklist
- ✅ Zigbee sensor successfully placed into pairing mode
- ✅ ZHA Interview completed without errors
- ✅ Device assigned to Area “Bathroom” with custom icon
- ✅ Live sensor data confirmed via breath test (temperature and humidity delta observed)
- ✅ Battery entity visible and reporting a percentage
What You Just Eliminated
- ❌ Vendor cloud hub costing $30 to $50 in additional hardware
- ❌ Mandatory vendor account and email registration
- ❌ Sensor data transiting servers outside your home
- ❌ Dependency on vendor uptime for your local automations to function
Your sensor data now flows from the device directly into Home Assistant over your local Zigbee network. No intermediate cloud. No third-party account. No single point of failure outside your own hardware.
Your Next Build — Automating the Bathroom Fan
Now that your sensor is reporting live data, you have everything you need to build your first real automation. Here is the logic:
Trigger:    sensor.bathroom_humidity rises above 70%
Action:     Turn on smart exhaust fan switch
Condition:  Only active between 06:00 and 22:00
            (prevents 3am fan activation during edge-case readings)
This automation runs entirely locally. No internet required. No cloud dependency. If your router goes down, the fan still turns on when you shower. That is the point of self-hosting your smart home stack.
If you are looking to expand your self-hosted infrastructure beyond Home Assistant, our guide on expanding a budget Zigbee hub for under €30 covers practical hardware options for growing your Zigbee network without overspending.
Going Deeper — When to Consider Zigbee2MQTT Instead
ZHA is the right starting point for the majority of users. If you scale past 20 to 30 devices, or if you add a device that ZHA’s quirks library does not fully support, Zigbee2MQTT becomes worth the additional operational complexity. It requires running a separate MQTT broker and the Z2M add-on or container, but it rewards that investment with a broader compatibility database and more granular configuration options. We will cover the Z2M setup path in a dedicated guide. For now, ZHA gets you running with zero additional infrastructure.