This guide covers the Itho Daalderop CVE WiFi add-on for local Home Assistant control via MQTT, without any cloud dependency. Why depend on fixed speeds (1, 2, or 3) on a plastic remote, or pay for an expensive manufacturer “smart” thermostat that sends your home climate data to a server you do not control? A community-developed local WiFi module lets you connect a 10-year-old Itho Daalderop CVE unit directly to Home Assistant via MQTT. No cloud. No latency. Your ventilation reacts to rising bathroom humidity in real time, and that data never leaves your house.
This guide covers the full process: physical installation, maintenance cleaning, sensor wiring, WiFi onboarding, MQTT configuration, and two practical automations that confirm the system works.
Which Control Method Is Right for You?
🎧 Listen to the 60-Second Audio Recap:
Before ordering anything, understand what you are actually upgrading from and to.
| Feature | Original RFT Remote | Itho CVE WiFi Add-on |
|---|---|---|
| Speed control | Fixed (1 / 2 / 3) | Stepless (e.g., exactly 42%) |
| Automation on humidity | ❌ | ✅ |
| RPM insight | ❌ | ✅ |
| Operating hours log | ❌ | ✅ |
| Existing remotes still work | ✅ | ✅ (as smart buttons in HA) |
| Local only / no cloud | ✅ | ✅ |
The original RFT remote works fine for standard use. The Itho CVE WiFi add-on is for anyone who wants to automate, monitor, and actually understand what their ventilation unit is doing.
Prerequisites and Hardware
Hardware Checklist
Verify every item before ordering. Compatibility is specific.
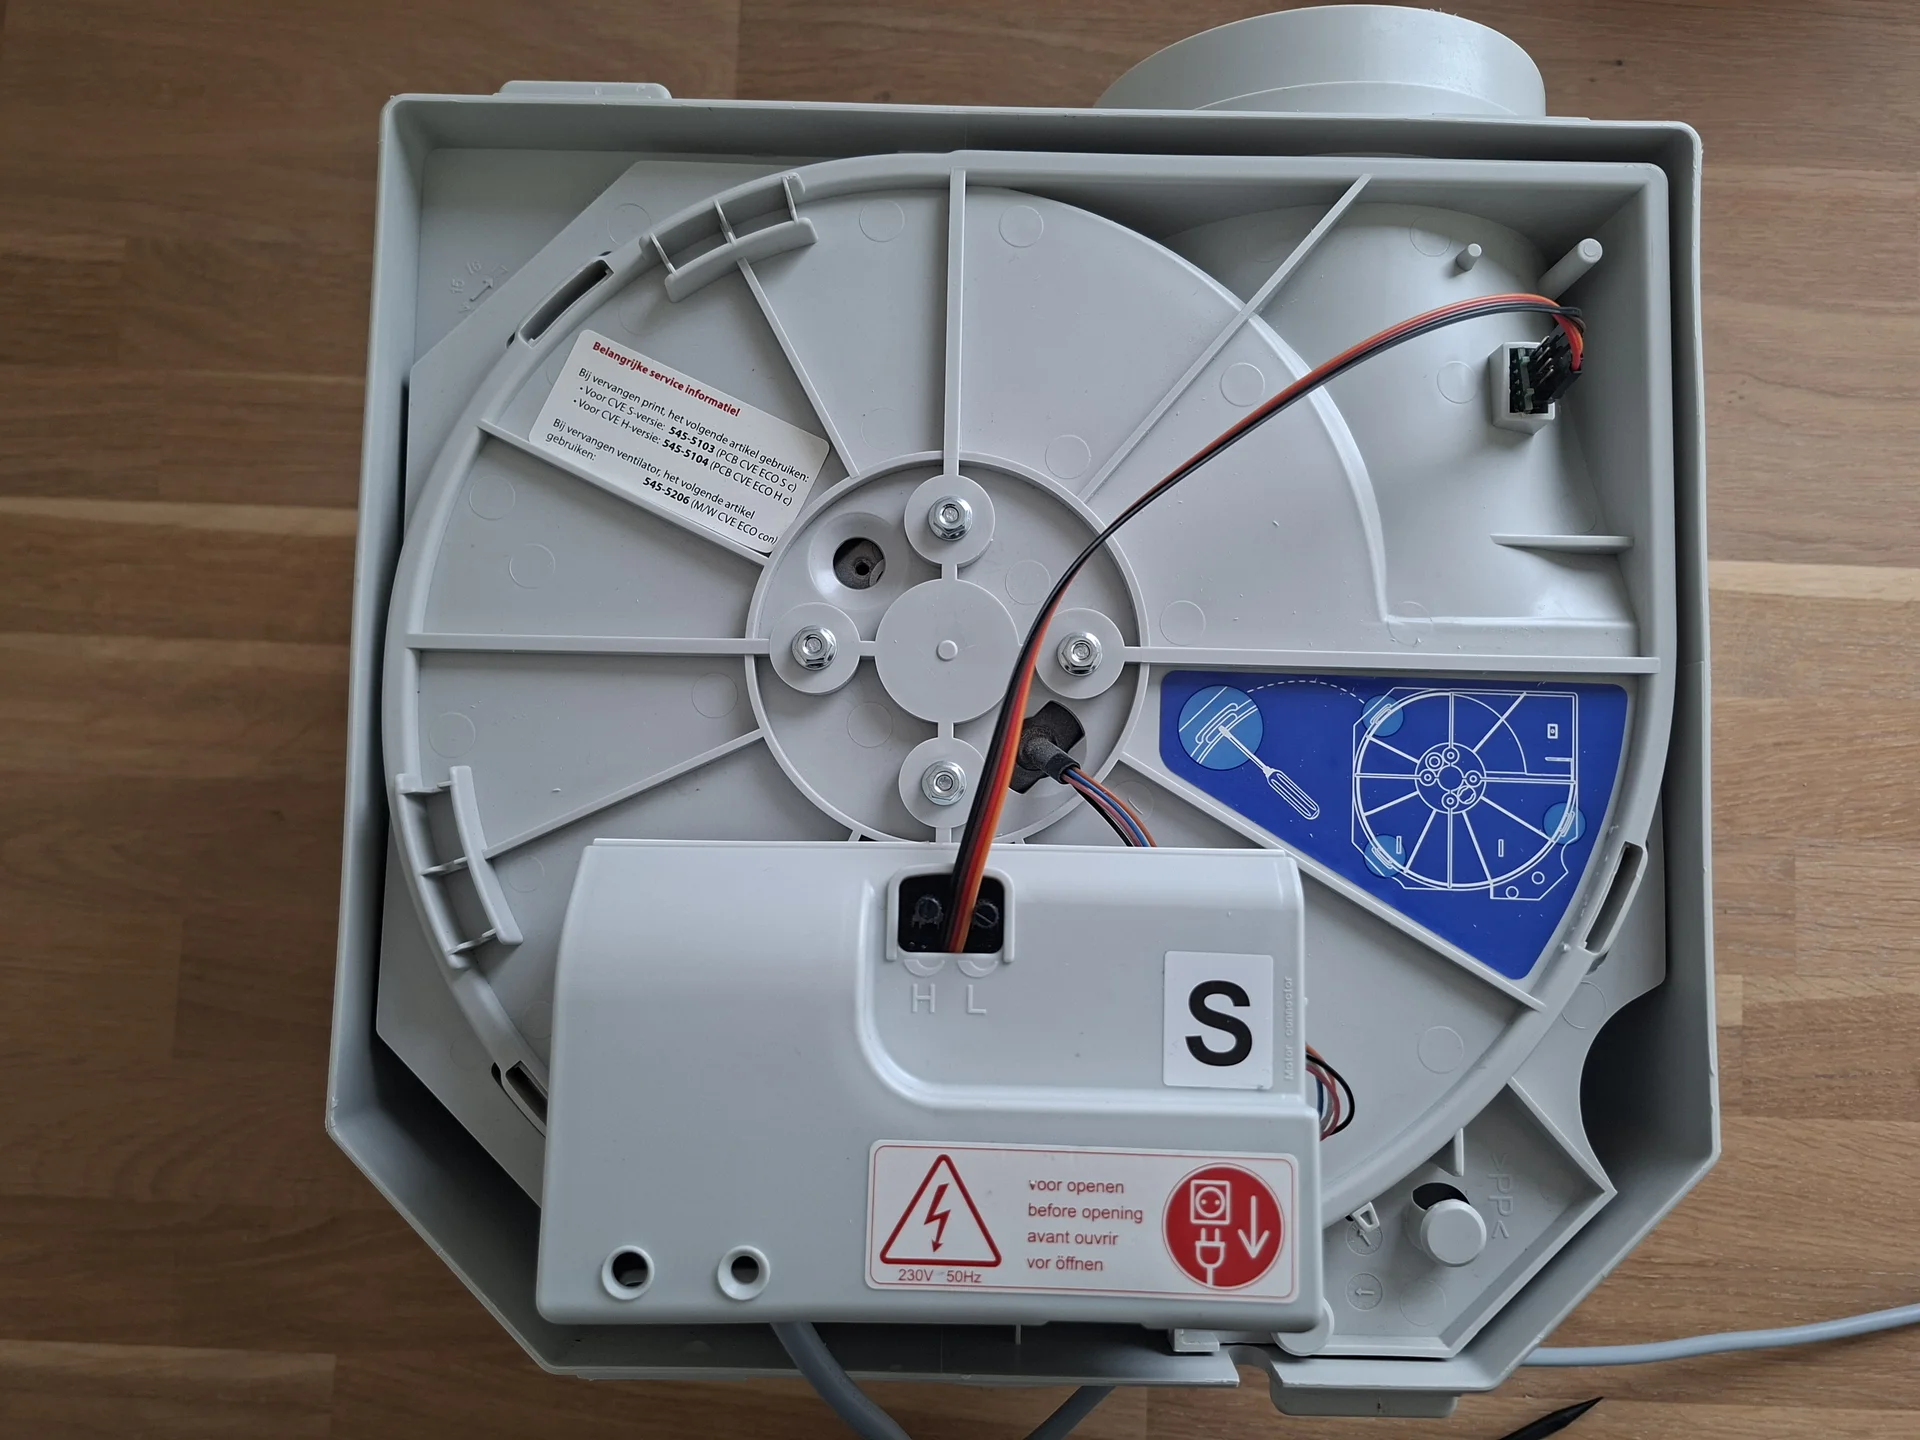
- Itho Daalderop CVE-S ECO (or comparable standard model with a blue or grey cap and an 8-pin connector on the motherboard). Check the connector before ordering anything.
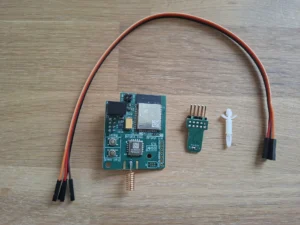
- Itho CVE WiFi add-on — Standard version only. Not the Optima Inside variant.
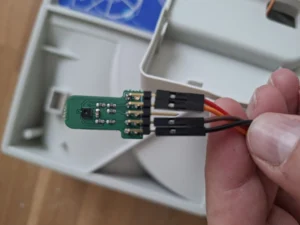
- Optional Temp/Humidity sensor (strongly recommended) + a set of DuPont cables (you need 3V3, GND, SDA, SCL connections).
- Tools: Screwdriver, Dremel with a small cutting or grinding bit, soft brush, Wolfbox air duster or a can of compressed air.
Software Checklist
- Home Assistant (any installation method) with an active MQTT broker running.
- Mosquitto add-on installed and running inside Home Assistant Supervisor.
- A dedicated MQTT user created in Home Assistant (for example, username:
itho).
If you do not yet have Home Assistant running, our guide on installing Home Assistant OS on a Proxmox VM walks you through the full setup from scratch.
Method 1: Physical Installation and Basic MQTT Setup
Step 1: Full Maintenance Disassembly
Before the module goes in, do the maintenance. This is the right moment. In most homes, the snail housing inside a CVE unit accumulates years of compacted dust on the fan blades and housing walls. That buildup reduces airflow, increases noise, and raises power draw.
- Unplug the 230V power cable from the Itho unit.
- Remove the blue or grey cap from the unit. It unclips without heavy tools.
- Extract the internal snail housing (the motor and fan blade assembly). It clicks apart without heavy tools. Work slowly and evenly.
- Use a soft brush to loosen compacted dust from the fan blades and the inside walls of the housing.
- Blow the entire unit clean with your Wolfbox air duster or compressed air. Work from the inside outward. Be thorough.
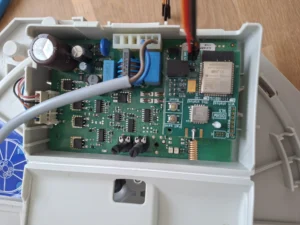
Step 2: Installing the WiFi Module
- Unbox the Itho CVE WiFi add-on.
- Press the included white plastic spacer into the designated hole on the Itho PCB.
- Align the green WiFi module over the 8 upright metal pins on the motherboard.
- Press down firmly and evenly. The module clicks onto the white spacer and seats securely. No loose power cables are required. No soldering.
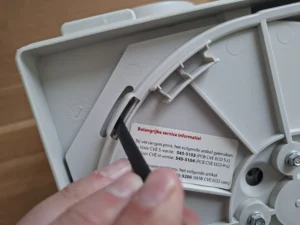
Step 3: Sensor Installation (Dremel Modification)
The temperature and humidity sensor needs to sit in the airflow path inside the housing to give accurate readings. There is already a small hole in the plastic housing for this purpose, but it is typically too narrow for the sensor body to fit flush and locked.
- Measure the diameter of your sensor body before cutting anything. The Dremel modification is irreversible.
- Use the Dremel to widen the existing hole just enough for the sensor to fit flush and remain locked in position by friction directly in the exhaust airflow. Do not over-cut.
- Seat the sensor in the widened hole so it sits directly in the airflow path.
- Connect the DuPont cables from the sensor to the module using the following pinout:
Sensor Pin  →  Module Pin
3V3         →  3V3
GND         →  GND
SDA         →  SDA
SCL         →  SCL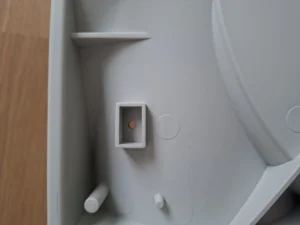
- Reassemble the housing and reconnect the 230V power plug.
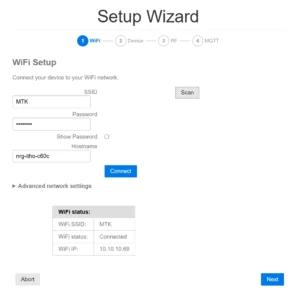
Step 4: Setup Wizard and WiFi Onboarding
With the unit powered back on, the module broadcasts its own temporary WiFi network for initial configuration.
- On your phone or laptop, scan for new WiFi networks. Look for a network name starting with
nrg-ithoorESP. - Connect to that network. A captive portal opens automatically. If it does not, navigate manually to
192.168.4.1in your browser. - Wizard Step 1 (Network): Enter your home WiFi network name and password.
- Wizard Step 2 (Device Settings): Select Standard (external RFT CO2 or alike). Your unit is not an Optima model. Do not select Optima Inside.
- Wizard Step 3 (RF Setup): Set the mode to Monitor Only. Point your existing RFT remote at the module and press any button. The module learns the remote’s RF signal.
Step 5: MQTT Connection to Home Assistant
- In the wizard, proceed to Step 4 (MQTT).
- Set MQTT Active to
ON. - Set Home Assistant MQTT Discovery to
ON. - In the Server field, enter the IP address of your Home Assistant instance.
- Enter the username of your dedicated MQTT user (e.g.,
itho) and the corresponding password. - Click Connect, then Finish.
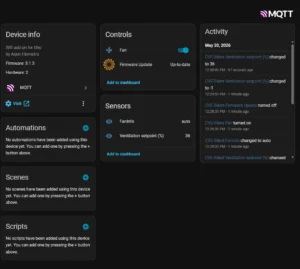
The module reboots and connects to your home network. Within a minute, it auto-appears in Home Assistant under your MQTT devices. You will see a fan entity with speed control. The sensor entities are not visible yet. That is covered in the next section.
Method 2: Unlocking Hidden Sensors and Advanced MQTT Entities
Step 6: Enabling Sensor Support in the Module Web UI
The temperature and humidity sensor is physically connected, but the module does not broadcast its data until you explicitly enable it. This is a one-time configuration step.
- Find the module’s local IP address in your router’s DHCP client table. Look for a device named
nrg-ithoor similar. - Navigate to that IP address in your browser. The module’s web UI loads.
- Go to System Settings.
- Set Additional sensor support to
ON. - Click Save, then restart the module from the same page.
Step 7: Manual HA Discovery Configuration
This is the step most people miss. Enabling sensor support in System Settings tells the module the sensor exists. You still need to tell the module which data points to broadcast via MQTT to Home Assistant. These are not enabled by default.
- In the module web UI, navigate to HA Discovery in the left menu.
- Locate the table labelled Itho Status Items.
- Manually check the Include checkbox for each of the following rows:
temphumFan speed (rpm)— useful for verifying actual motor response to your automation commandsTotal operation (hours)— use this to schedule filter maintenance notifications in HA
- Click Save and update.

The selected entities now broadcast via MQTT and appear in Home Assistant as individual sensor entities. If they do not appear within 60 seconds, restart the module once more from System Settings.
Step 8: Assign a Static IP to the Module
Your router assigns IP addresses dynamically by default. After a router reboot, the module may receive a different IP address, which breaks the MQTT connection. Prevent this by creating a DHCP reservation.
The exact steps vary by router, but the principle is universal: find the module’s MAC address in your router’s DHCP client table, then create a reservation that always assigns the same IP to that MAC address. A generic example:
# Router DHCP reservation — generic example
# Find in your router admin panel under:
# LAN Settings > DHCP Server > Address Reservation (or Static Leases)

Device Name : nrg-itho
MAC Address : AA:BB:CC:DD:EE:FF   # Replace with actual MAC from DHCP table
Reserved IP : 192.168.1.150        # Choose a free IP outside your DHCP range
After saving the reservation, reboot the module. Confirm it receives the reserved IP. Update the MQTT server address in the module’s wizard if you change the IP.
Configuration and Validation: Two Automations That Prove the System Works
itho/cmd) are not specified in the module’s official setup documentation. The exact topic your module publishes and subscribes to is assigned automatically by Home Assistant MQTT Discovery and will be visible in your Home Assistant MQTT device page after completing Steps 5–7. Before activating any automation that uses mqtt.publish, navigate to your Home Assistant MQTT device, inspect the entity’s topic in the device info or via the MQTT integration panel, and replace the placeholder topic in the YAML below with the actual topic shown there. Using an incorrect topic will silently fail — the fan will not respond.Automation 1: Free Cooling (Summer Night Ventilation)
In summer, heat accumulates indoors during the day. Once the sun sets, outdoor temperatures often drop while the house remains warm. Instead of running an air conditioner, you can use the mechanical ventilation as a large extractor: pump hot indoor air out, and cool outdoor air is drawn in passively through window trickle vents. The energy cost is limited to the fan itself.
The automation checks every 15 minutes whether conditions are right. When indoor temperature exceeds your comfort threshold and outdoor air is at least 2 degrees cooler, the fan ramps up to 85%. When the indoor temperature drops back below 22°C, or when outdoor temperature exceeds indoor temperature at sunrise, the fan returns to its base level.
# NOTE: Replace "itho/cmd" below with the actual MQTT command topic
# shown in your Home Assistant MQTT device page for this module.
alias: "Free Cooling - Summer Night Ventilation"
description: "Ramp up CVE when outdoor air is cooler than indoor air at night"
trigger:
  - platform: time_pattern
    minutes: "/15"
condition:
  - condition: numeric_state
    entity_id: sensor.living_room_temperature
    above: 23
  - condition: template
    value_template: >
      {{ states('sensor.outdoor_temperature') | float <
         (states('sensor.living_room_temperature') | float - 2) }}
  - condition: time
    after: "21:00:00"
    before: "07:00:00"
action:
  - service: mqtt.publish
    data:
      topic: "itho/cmd"
      payload: '{"speed": 85}'
mode: single
# NOTE: Replace "itho/cmd" below with the actual MQTT command topic
# shown in your Home Assistant MQTT device page for this module.
alias: "Free Cooling - Reset to Base"
description: "Return CVE to base speed when free cooling conditions no longer apply"
trigger:
- platform: numeric_state
entity_id: sensor.living_room_temperature
below: 22
- platform: sun
event: sunrise
action:
- service: mqtt.publish
data:
topic: "itho/cmd"
payload: '{"speed": 20}'
mode: singleAutomation 2: The Whisper-Quiet Bedroom (CO2 Stealth Mode)
Standard “Medium” speed on most CVE units sits around 50% capacity. That is audible through bedroom vents at night. Standard “Low” keeps it quiet but lets CO2 climb above 900 ppm, which disrupts sleep quality. The stepless control of the WiFi add-on addresses this directly: 32% is typically enough to refresh a bedroom while remaining acoustically inaudible through the vents.
The automation triggers when a CO2 sensor in the bedroom crosses 900 ppm during night hours. The fan moves to 32%. When CO2 drops back below 700 ppm, the fan returns to a 15% base level.
Note: This automation requires a separate CO2 sensor integration in your bedroom, as the Itho add-on sensor only measures temperature and humidity.
# NOTE: Replace "itho/cmd" below with the actual MQTT command topic
# shown in your Home Assistant MQTT device page for this module.
alias: "CO2 Stealth Mode - Night Bedroom"
description: "Quiet ventilation boost when bedroom CO2 rises at night"
trigger:
  - platform: numeric_state
    entity_id: sensor.bedroom_co2
    above: 900
condition:
  - condition: time
    after: "22:30:00"
    before: "07:00:00"
action:
  - service: mqtt.publish
    data:
      topic: "itho/cmd"
      payload: '{"speed": 32}'
mode: single
# NOTE: Replace "itho/cmd" below with the actual MQTT command topic
# shown in your Home Assistant MQTT device page for this module.
alias: "CO2 Stealth Mode - Reset to Base"
description: "Return CVE to base speed when bedroom CO2 is back in range"
trigger:
- platform: numeric_state
entity_id: sensor.bedroom_co2
below: 700
condition:
- condition: time
after: "22:30:00"
before: "07:00:00"
action:
- service: mqtt.publish
data:
topic: "itho/cmd"
payload: '{"speed": 15}'
mode: singlePro extension: Linear CO2 scaling template. Instead of a fixed 32% target, this template scales fan speed proportionally with the CO2 reading, capped at 40% to prevent audible noise at night. The formula is: fan_percentage = min(40, ((co2_ppm - 700) / 200) * 25 + 15).
# NOTE: Replace "itho/cmd" below with the actual MQTT command topic
# shown in your Home Assistant MQTT device page for this module.
alias: "CO2 Stealth Mode - Linear Scaling (Pro)"
description: "Scale fan speed linearly with CO2 value, capped at 40% for silence"
trigger:
  - platform: state
    entity_id: sensor.bedroom_co2
condition:
  - condition: time
    after: "22:30:00"
    before: "07:00:00"
  - condition: numeric_state
    entity_id: sensor.bedroom_co2
    above: 700
action:
  - service: mqtt.publish
    data:
      topic: "itho/cmd"
      payload: >
        {% set co2 = states('sensor.bedroom_co2') | float %}
        {% set speed = [40, ((co2 - 700) / 200 * 25 + 15)] | min %}
        {% set speed = [speed, 15] | max %}
        {"speed": {{ speed | round(0) | int }}}
mode: single
This gives you proportional night ventilation. The fan barely moves at 710 ppm and reaches its 40% ceiling only when CO2 climbs to 900 ppm. Everything in between is calculated automatically.
The Ugly Truth: Quirks and Limitations
What This Guide Does Not Cover
- HRU / WTW (heat recovery) systems — completely different hardware, different module variant, different wiring. Nothing in this guide applies.
- Optima Inside models — different firmware path, not covered here. The setup wizard explicitly warns you to select the correct device type.
- CVE units without the 8-pin connector — verify your motherboard has this connector before ordering. Older or non-standard variants may differ.
Known Quirks
- The module web UI is functional but sparse. Do not expect a polished interface. It does the job.
- MQTT Discovery does not auto-include sensor entities. The manual checkbox step (Step 7) is non-optional. It is the most frequently missed step, confirmed repeatedly in community reports.
- The Dremel modification to the housing is irreversible. Measure the sensor diameter before you cut.
temp, hum, Fan speed (rpm), and Total operation (hours). This takes 60 seconds and prevents hours of confusion.Troubleshooting Common Errors
Error: Ordered the Wrong Module or Wrong Accessories
Symptom: The module does not fit the PCB, or the product listing mentions adapters not referenced in this guide.
Fix: CVE with a blue or grey cap requires the Standard module. It fits directly over the 8 pins on the motherboard. No adapters. No HRU adapters. No additional boards. The product page sells modules for multiple product families. Verify your unit model before ordering and match it to the correct product listing. Do not order the Optima Inside variant.
Error: Sensor Returns No Data or Shows Unavailable in Home Assistant
Symptom: The temp and hum entities show as unavailable, or they never appear at all.
Fix 1: Check DuPont cable orientation. SDA and SCL are frequently swapped during installation. Open the housing, swap those two cables, and recheck.
Fix 2: Confirm that Additional sensor support is set to ON in System Settings (Step 6). If you skipped that step, the module does not know the sensor is physically present.
Error: Fan Entity Appears in HA But No Sensor Entities
Symptom: Fan speed control works correctly. Temperature and humidity entities are completely absent from Home Assistant.
Fix: Step 7 was skipped. Navigate to the module web UI, go to HA Discovery, locate the Itho Status Items table, and manually check the Include column for temp, hum, Fan speed (rpm), and Total operation (hours). Click Save and update. Entities appear in Home Assistant within 60 seconds.
Error: Module Connects to WiFi But Drops MQTT Connection Periodically
Symptom: All entities go unavailable intermittently. The module is visible on the network but HA loses contact.
Fix: Assign a static IP via router DHCP reservation (Step 8). A changing IP address after a router reboot is the most common cause of this symptom. Also verify that the Mosquitto add-on is configured to restart automatically in Home Assistant Supervisor under the add-on’s Watchdog setting.
Completion Checklist and Next Steps
Completion Checklist
Before closing this guide, confirm each item is done.
- ☐ Snail housing disassembled and cleaned
- ☐ WiFi module seated on the 8-pin connector
- ☐ Sensor installed in airflow path with correct pinout (3V3, GND, SDA, SCL)
- ☐ Module onboarded to home WiFi via captive portal at
192.168.4.1 - ☐ Device type set to Standard (not Optima Inside)
- ☐ RF mode set to Monitor Only, remote paired
- ☐ MQTT Active ON, HA MQTT Discovery ON, dedicated MQTT user credentials entered
- ☐ Additional sensor support enabled in System Settings
- ☐
temp,hum,Fan speed (rpm), andTotal operation (hours)checked in HA Discovery table - ☐ Static IP reserved in router DHCP table
- ☐ Actual MQTT command topic confirmed from HA MQTT device page before activating any automation