Build a Privacy-First DIY NAS on Proxmox with Native ZFS and a Lightweight LXC FileServer
🎧 Listen to the 60-Second Audio Recap:
Your First Step Away from Google Drive and Google Photos
Google Drive scans your files. Google Photos trains its models on your memories. And every year, the free tier shrinks a little more. You are not the customer. You are the product.
This guide builds the storage foundation that makes true data ownership possible. We are going to create a native ZFS RAID-Z1 pool directly on Proxmox, spin up a sub-1GB RAM Ubuntu LXC container running Samba, and connect the two using Bind Mounts. The result is a mapped network drive accessible from Windows Explorer — and the exact foundation that Nextcloud and Immich will plug into later in this series.
Here is what this guide delivers:
- A native ZFS RAID-Z1 pool on Proxmox (no TrueNAS VM overhead)
- A lightweight Ubuntu 24.04 LXC container running Samba, using under 1GB of RAM
- Bind Mounts connecting ZFS datasets directly into the container filesystem
- A persistent mapped network drive accessible from Windows
The Reddit question answered upfront: The r/homelab and r/Proxmox communities ask constantly — “Should I use a TrueNAS VM with PCIe passthrough, or native ZFS on Proxmox?” The short answer: native ZFS on Proxmox wins for efficiency and flexibility. A TrueNAS VM demands 8GB or more of RAM just to boot, and it locks your storage behind one OS. Native ZFS lets every LXC container on your node access the same datasets directly via Bind Mounts, with zero network overhead between them. We cover the full architecture rationale in the Pro section below.
Prerequisites and Minimal Hardware
What You Need Before You Start
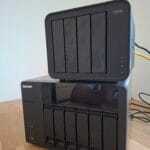
This is not a guide that requires exotic hardware. A modest dedicated machine is enough. Here is the checklist:
- A dedicated machine running Proxmox VE, installed on a separate OS drive (for example, a 2TB NVMe)
- Minimum 3 identical HDDs for RAID-Z1 (for example, 3x 3TB — same model strongly recommended)
- Optional: 1 fast NVMe SSD for databases and thumbnails (for example, 1TB NVMe)
- Minimum 8GB system RAM (16GB recommended to give ZFS a healthy ARC cache)
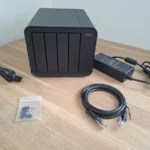
If you are evaluating hardware for this kind of build, our review of the TerraMaster F4-424 Pro as a Proxmox host covers a purpose-built machine that handles this workload well.
Pre-Flight Checks in the Proxmox GUI
- Confirm Proxmox VE is installed and accessible at
https://<node-ip>:8006. - Navigate to
Node → Disksand confirm your storage HDDs are visible. - Critical: All target storage disks must be wiped before pool creation. Select each disk and click Wipe Disk. This is destructive and irreversible — confirm you have the right disks.
- Open
Node → Shelland confirm no existing ZFS pools claim these disks:
zpool listIf the output shows existing pools on your target disks, stop here and resolve that before continuing.
Software and Knowledge Prerequisites
- Basic comfort with a Linux terminal. Copy-paste level is sufficient for the Newbie route.
- Proxmox VE 8.x — the commands in this guide are version-specific.
- Ubuntu 24.04 LXC template — we download this during Step 3.
Method 1 — The Quick Start (Newbie Route)
Goal: A working NAS accessible from Windows Explorer in under 60 minutes, using the GUI wherever possible.
Step 1 — Create ZFS Pools via the Proxmox GUI
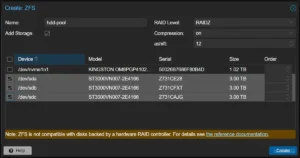
Navigate to Node → Disks → ZFS → Create: ZFS.
Pool 1 — HDD Array:
- Set Name to
hdd-pool. - Set RAID Level to
RAIDZ. - Set Compression to
on(LZ4 is the default and is excellent). - Set ashift to
12(correct for modern 4K-sector drives). - Select all 3 HDDs from the disk list.
- Click Create.
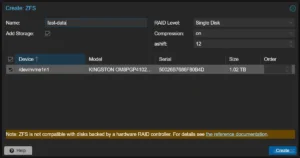
Pool 2 — Fast NVMe SSD (Optional but recommended):
- Set Name to
fast-data. - Set RAID Level to
Single Disk. - Set Compression to
on. - Select the NVMe SSD.
- Click Create.
Wait for both pools to finish creating. You will see them appear in the left sidebar under your node name.
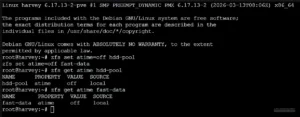
Step 2 — ZFS Optimization (Proxmox Shell)
Navigate to Node → Shell. We are going to disable atime on both pools.
Why this matters: By default, ZFS writes a timestamp to every file every time it is read. On a media library with thousands of files, this turns read operations into write operations — unnecessary wear on spinning HDDs and wasted I/O. Disabling atime eliminates this entirely.
zfs set atime=off hdd-pool
zfs set atime=off fast-data
# Validate:
zfs get atime hdd-pool
The output should look like this:
NAME      PROPERTY  VALUE  SOURCE
hdd-pool  atime     off    local
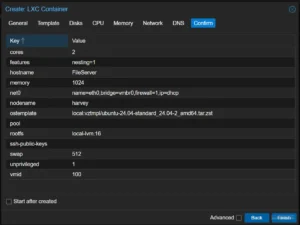
Step 3 — Create the Ubuntu 24.04 LXC Container (FileServer)
First, download the Ubuntu 24.04 template. In the Proxmox GUI, navigate to local storage → CT Templates → Templates, search for ubuntu-24.04, and click Download. Wait for the download to complete.
Now create the container. Click Create CT in the top-right corner and use these settings:
| Setting | Value |
|---|---|
| Hostname | FileServer |
| Unprivileged container | ✅ ON |
| Template | Ubuntu 24.04 |
| Disk | 8GB on local-lvm |
| CPU | 2 Cores |
| Memory | 1024 MB |
| Network | DHCP |
Click Finish to create the container.
Step 4 — Create Directories and Configure Bind Mounts (Proxmox Shell)
What is a Bind Mount? It punches a direct hole from a directory on the Proxmox host filesystem into the LXC container’s filesystem. No network protocol. No translation layer. The container sees the ZFS dataset as if it were a local disk.
Go back to Node → Shell. The following commands assume your container ID is 100. Verify this in the Proxmox GUI sidebar — the number appears next to the container name.
# Create the dataset directories on the Proxmox host
mkdir -p /hdd-pool/Opslag
mkdir -p /fast-data/SnelleData

# Set permissions
# Note: 777 is the quick-start approach. See the Pro section for hardened UID/GID mapping.
chmod -R 777 /hdd-pool/Opslag
chmod -R 777 /fast-data/SnelleData

# Attach the directories to LXC container 100 as mount points
pct set 100 -mp0 /hdd-pool/Opslag,mp=/mnt/opslag
pct set 100 -mp1 /fast-data/SnelleData,mp=/mnt/snelle_data
Now start the container and open the Console. Use the GUI: select LXC 100 in the sidebar and click Start. To verify the mounts were applied correctly, navigate to LXC 100 → Resources in the GUI. You should see mp0 and mp1 listed there.
Step 5 — Install and Configure Samba Inside the LXC (LXC Console)
Open the container console: Proxmox GUI → LXC 100 → Console.
First, update the system and install Samba:
apt update && apt upgrade -y
apt install samba -y
Next, create a dedicated NAS user. This user has no home directory and cannot log into the system via SSH — it exists only to authenticate Samba connections:
# Create the NAS user (no home directory, no shell login)
adduser --no-create-home --disabled-password --gecos "" nasuser

# Set the Samba password for this user
smbpasswd -a nasuser
# (Vul wachtwoord 2x in)
Now edit the Samba configuration file:
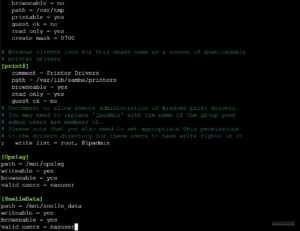
nano /etc/samba/smb.confScroll to the very bottom of the file and append the following share definitions:
[Opslag]
path = /mnt/opslag
writeable = yes
browseable = yes
valid users = nasuser

[SnelleData]
path = /mnt/snelle_data
writeable = yes
browseable = yes
valid users = nasuser
Save the file with Ctrl+O, then Enter, then exit with Ctrl+X.
Restart Samba and find the container’s IP address:
systemctl restart smbd
ip a
Note that IP address. You will need it in the validation step.
Method 2 — The Pro Setup
Architecture Decision — Why Native ZFS on Proxmox Beats a TrueNAS VM
This is the direct answer to the question that appears weekly on r/homelab and r/Proxmox.
RAM efficiency: A TrueNAS VM requires 8GB or more of RAM dedicated exclusively to the NAS operating system. That RAM is unavailable to anything else on your node. The LXC FileServer in this guide uses under 1GB total.
The direct data access pipeline: With native ZFS on Proxmox, a single ZFS dataset can be Bind Mounted into multiple LXC containers simultaneously. Your FileServer LXC shares it over SMB. Your Nextcloud LXC reads and writes to it directly. Your Immich LXC accesses the Photos subdirectory. All of them operate at bare-metal ZFS speed with zero network hops between containers.
With a TrueNAS VM, every other service on your node must reach storage over NFS or SMB — adding latency and CPU overhead for every single file operation.
Future-proofing: When we add Nextcloud and Immich in the next guides, they each receive their own Bind Mount directly into the ZFS dataset. No NFS share. No SMB tunnel between containers. Just a direct filesystem path.
The architecture looks like this:
Proxmox Host
└── ZFS Pools (hdd-pool, fast-data)
    ├── Bind Mount → LXC: FileServer (Samba — Windows access)
    ├── Bind Mount → LXC: Docker (Nextcloud — web access)
    └── Bind Mount → LXC: Docker (Immich — photo management)
Security Hardening — Replace chmod 777 with UID/GID Mapping
Why 777 is a problem: Setting permissions to 777 means any process running inside the LXC container has full read and write access to those directories. For a single-user homelab, this is acceptable. For a multi-service environment where Nextcloud and Immich run alongside your file server, it is a real risk — a compromised container could modify data belonging to another service.
The concept: Unprivileged LXC containers use UID/GID mapping. The container’s internal root user (UID 0) maps to a high-range UID on the host (typically UID 100000). A regular user with UID 1000 inside the container maps to host UID 101000. Bind Mount permissions on the host must match these mapped UIDs.
# On the Proxmox host: set ownership to the mapped UID for nasuser (UID 1000 inside container)
# Container UID 1000 maps to host UID 101000 in a standard Proxmox unprivileged LXC
chown -R 101000:101000 /hdd-pool/Opslag
chmod -R 750 /hdd-pool/Opslag

# Verify the mount point configuration in the LXC config file
cat /etc/pve/lxc/100.conf | grep mpZFS Dataset Strategy for Multi-Service Environments
Instead of one flat directory shared by everything, create child datasets per service. This gives you per-dataset snapshots, per-dataset quotas, and per-dataset compression settings — all managed independently.
# Create child datasets for organized, service-specific storage
zfs create hdd-pool/Opslag/Media
zfs create hdd-pool/Opslag/Photos
zfs create hdd-pool/Opslag/AppData
zfs create fast-data/SnelleData/NextcloudDB
zfs create fast-data/SnelleData/ImmichThumb
Each of these datasets can later be Bind Mounted directly into the relevant LXC container. Nextcloud gets hdd-pool/Opslag/AppData. Immich gets hdd-pool/Opslag/Photos. Clean, isolated, and fast.
Configuration and Validation
Validate Bind Mounts in the Proxmox GUI
Navigate to LXC 100 → Resources. Confirm that mp0 and mp1 are listed with their correct host paths and container mount points. If they are missing, the pct set commands from Step 4 did not execute correctly — re-run them and restart the container.
Validate ZFS Properties via Shell
# Check atime status on the HDD pool
zfs get atime hdd-pool
# Expected output: hdd-pool  atime  off  local

# Check overall pool health
zpool status hdd-pool
# Expected output: state: ONLINE, all member disks showing ONLINE
Validate Network Access from Windows
- Open Windows Explorer.
- Click in the address bar and type:
\\<LXC-IP>(for example,\\10.10.10.6). - A credential prompt will appear. Enter
nasuserand the password you set withsmbpasswd. - You should see the
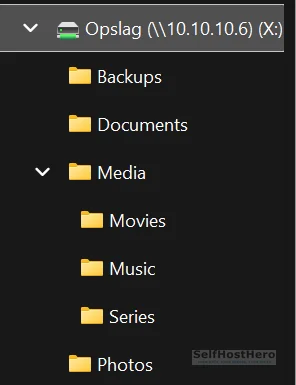
OpslagandSnelleDatashares listed. - To map as a persistent drive: right-click the share → Map network drive → assign drive letter
X:→ check Reconnect at sign-in.
The Ugly Truth — Quirks and Hard Limits
ZFS Deduplication — Do Not Enable This
ZFS deduplication sounds appealing. It is not appropriate for a home media server. It requires between 1GB and 5GB of RAM per 1TB of stored data to maintain its deduplication table in memory. Photos and video files have near-zero deduplication benefit because they are already unique binary data. If your RAM runs out, ZFS performance collapses catastrophically — not gracefully.
Use LZ4 compression instead. It is enabled by default in this guide, it costs almost nothing in CPU overhead, and it delivers real space savings on text-based files and databases.
The 85% Fill Rule — Non-Negotiable
ZFS performance degrades significantly when a pool exceeds 85% capacity. This is a fundamental property of the copy-on-write architecture. Plan your storage expansion before you hit this threshold, not after.
Monitor pool capacity regularly with:
zpool listWatch the CAP column. When it approaches 80%, start planning your next drive purchase.
For reference: RAID-Z1 with 3x 3TB drives gives you approximately 6TB of usable space. Plan accordingly.
RAID-Z1 Is Not a Backup
RAID-Z1 survives one disk failure. But during the resilver process (rebuilding the array after a failed disk is replaced), the pool is fully vulnerable. A second disk failure during resilver means total data loss. On large HDDs, a resilver can take 12 to 48 hours.
RAID is not a backup. Follow the 3-2-1 rule: 3 copies of your data, on 2 different media types, with 1 copy offsite or offline. At minimum, maintain a periodic backup to a separate physical drive that is not part of the ZFS pool.
Troubleshooting Common Errors
Error: “You can’t access this shared folder because your organization’s security policies block unauthenticated guest access” (Windows 11)
Root cause: Windows 11 silently attempts to authenticate using your Microsoft account credentials. Samba rejects this because it does not know your Microsoft account. Windows then falls back to anonymous guest access, which Windows 11 blocks by default as a security policy. The error message is misleading — this is not an organizational policy issue, it is a credential mismatch.
Fix — try these three methods in order:
- Type the full UNC path directly into the Explorer address bar, including the share name:
\\10.10.10.6\Opslag. This forces Windows to prompt for credentials rather than attempt silent authentication. - At the credential prompt, prefix the username with a backslash or the server IP: enter
\nasuseror10.10.10.6\nasuseras the username, and enter thesmbpasswdpassword. Check Remember my credentials. - Map the drive directly from the command line, bypassing the GUI entirely:
net use X: \\10.10.10.6\Opslag /user:nasuser /persistent:yesMethod 3 is the most reliable. It explicitly specifies the user and forces Windows to store the credentials correctly.
Error: Bind Mount Directory Not Visible Inside the LXC
# Verify the mount point configuration was written to the LXC config file
cat /etc/pve/lxc/100.conf | grep mp

# Verify the source directory exists on the host
ls -la /hdd-pool/Opslag

# Stop and restart the container to apply mount changes
pct stop 100 && pct start 100
If the grep mp output is empty, the pct set commands did not run successfully. Re-run Step 4 and check for typos in the container ID.
Error: ZFS Pool Not Created / Disk Not Available
- Confirm the disk was wiped: navigate to
Node → Disksand verify no partition table is shown for the target disk. - Check for existing pool claims on the disk:
zpool importThis lists any pools that ZFS can detect on connected disks. If your target disk appears here, it is still claimed by an old pool.
- To force-clear a disk’s ZFS label — this is destructive, confirm the device path before running:
# Replace /dev/sdX with the actual device path of the target disk
# Verify with: lsblk
zpool labelclear /dev/sdX
Conclusion and Next Steps
What Was Built — Completion Checklist
- ☐ ZFS RAID-Z1 pool (
hdd-pool) configured and showing state: ONLINE - ☐ ZFS Single Disk pool (
fast-data) configured and showing state: ONLINE - ☐
atime=offapplied and validated on both pools - ☐ Unprivileged Ubuntu 24.04 LXC running at under 1GB RAM
- ☐ Bind Mounts (
mp0,mp1) confirmed in LXC Resources tab - ☐ Samba shares accessible from Windows as mapped drive
X:
You now have a self-hosted storage layer that you fully control. No subscription. No scanning. No third-party access to your files.
What Comes Next in This Series
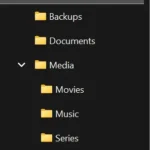
The immediate next step is data migration. Copy your files from old systems to \\<LXC-IP>\Opslag and build your directory structure: separate folders for Media, Photos, and AppData.
After that, the series continues:
- Deploy a Docker LXC on the same Proxmox node — this becomes the runtime environment for your self-hosted apps.
- Connect Nextcloud directly to
hdd-pool/Opslagvia Bind Mount — your self-hosted Google Drive replacement, with no SMB overhead between the app and the storage. - Connect Immich directly to
hdd-pool/Opslag/Photos— your self-hosted Google Photos replacement, with AI-powered search running locally on your own hardware.
If you are evaluating whether to build this on dedicated NAS hardware versus a general-purpose mini PC, our TerraMaster F4-424 Pro storage review covers exactly that trade-off in detail.
The storage foundation is live. Everything else builds on top of it.